How to use FTP and SFTP for file transfer
File transfer is an absolutely everyday task for developers and system administrators in general since the beginning. Inherent in these activities are maintainability and overlay files in geographically distant servers remotely. After all, who never needed to make an FTP or SFTP access, both to proceed with an upload or download files, cast the first stone! Now we will try to understand the process of file transfer using SFTP.
Connecting to the server via SFTP
Assuming that you already have installed and run the FileZilla Client program previously, the first activity you need to do is connect to a server.
The below-updated details are just for reference. Please use your own information if you want to successfully continue this tutorial.
Hostname: example.org
Username: john
Password: 7PjU # .J3
Use the quick-connect bar (Quick Connect) to establish the connection:
![]()
Enter the hostname into the quick-connect bar’s Host: field, the username in the Username: field, and the password in the Password: field. You can leave the Port: field blank unless your login information specifies a specific port to use. Now you need to click on Quickconnect.
Note: If your login information specifies a protocol like SFTP or FTPS, type hostname in the field as follows: sftp://hostname or ftps://hostname respectively.
FileZilla will now try to connect to the server and if everything works correctly, you will notice that the right “column” changes from Not connected to any server to displaying a list of files and directories.
The next step is to understand the organization of the FileZilla window layout.
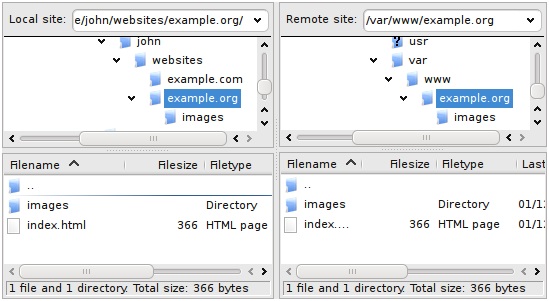
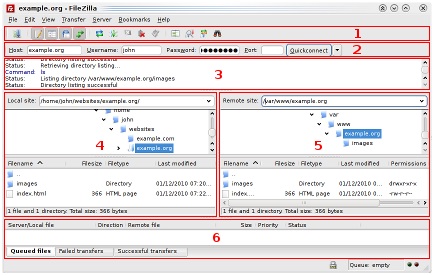
This is a quick introduction: Below the toolbar (1) and quick-connect bar (2), the message log (3) displays the transfer and connection-related messages. Below you will find the list of files. The left column (Local pane, 4) displays the local files and directories, i.e. objects on the PC being used in FileZilla. The right column (server pane 5) displays the files and directories on the server to which you have connected. Both columns use a directory tree as a header and a detailed directory listing by selected directories at the bottom.
You can easily browse through directories by clicking on them with the mouse cursor, as in any file manager. At the bottom of the window is the transfer queue (6), which lists the files that will begin to be transferred or already have been transferred.

Now we will upload the following files (or you can choose other files):
website /
+ – Index.html
+ – Images /
+ – Image01.jpg
+ – Image02.jpg
Uploading; files

First – in the Local pane – position yourself in the directory in which the files need to be uploaded (eg index.html and images /). Now navigate to the target directory on the server (using the server pane file list). To upload the information, select the files/directories and drag the panel respectively from the Local panel to the remote pane. You will notice that the files will be deployed in the transfer queue at the bottom of the window and soon thereafter get removed again – since they were (if everything worked correctly) after being transferred to the server. Files and directories that were uploaded to the server soon will be displayed in the server list in the right column of the window.
Note: If you do not like to use the drag-and-drop option, you can simply right-click on the files/directories (local panel) and select Upload to upload the selected content – or simply double-click on a specific file (this does not apply equally to directories).
Note (Advanced): If you enable filtering and upload a complete directory, only unfiltered files within the directory will be transferred.
Downloading files
Downloading files, or entire directories, works essentially the same way as uploading files – you simply drag files/directories from the server panel to your local panel, and drag files/directories right (server) to left (local).
Note: In case of trying (accidentally) to overwrite any files during download or upload, FileZilla will automatically display a message asking for the action to be performed (overwrite, rename, skip …).
Using Site Manager
Now that you know how to transfer files (if not, practice a little more), you may want to add the server information to the site administrator to make it easier to connect to the server. To do this, choose Copy current connection to Site Manager in the File menu. The site administrator will be opened and a new record is created with all important information that is already updated. You will notice that the name of the record is selected and underlined or highlighted – you can enter some descriptive text so you can find the server again (type something like domain.com FTP server for example – you can rename it later if you wish). Now close the message window by clicking OK.
When you need to connect to that server next time, you can simply select it from the site administrator and click on Connect.
Conclusion
You should now be able to use the basic features of FileZilla.

