How to install an SSL using AutoSSL in cPanel
Estimated reading time: 1 min
Nornmally, AutoSSL should install by itself without users intervention especially once AutoSSL is enabled. Sometimes it becomes necessary to overwrite and initiate AutoSSL installation due to various reasons including needing to have SSL installed immediately. Installing an SSL certificate using AutoSSL in cPanel is a simple process, as AutoSSL is an automatic SSL management tool that issues free certificates for your domains. AutoSSL takes 5 to 15 minutes to install. Here are the steps to install an SSL certificate using AutoSSL:
1. Log into cPanel:
- Access your cPanel account by navigating to
yourdomain.com/cpaneland logging in with your credentials.
2. Locate AutoSSL in cPanel:
- Scroll down to the “Security” section and click on “SSL/TLS Status” or “Manage AutoSSL” depending on your cPanel version (you can also use the search button on cPanel).

3. Run AutoSSL:
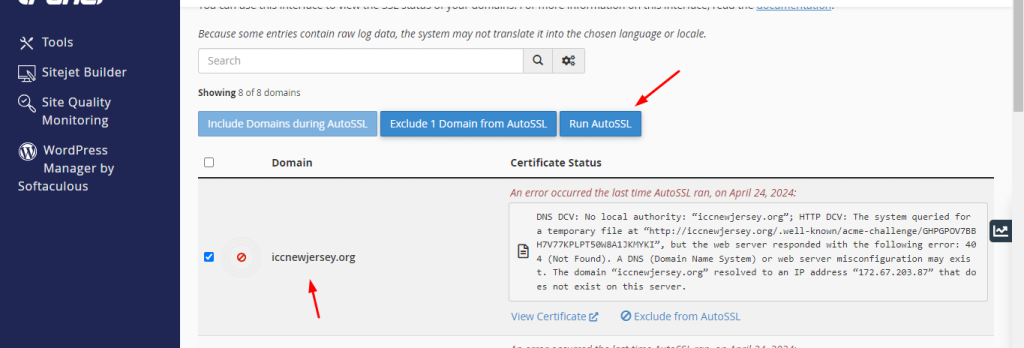
- Inside the AutoSSL interface, you’ll see a list of your domains and their current SSL status.
- If you haven’t enabled AutoSSL yet, you may see a button labeled “Run AutoSSL” or “Enable AutoSSL”. Click that to start the AutoSSL process.

4. Check Domain Coverage:
- AutoSSL will scan your account and automatically issue and install SSL certificates for all the domains/subdomains under your cPanel account.
- Make sure the domains you want covered are selected, then click on “Run AutoSSL”.
5. Wait for Installation:
- AutoSSL will now check for eligible domains and install the SSL certificates. This process usually takes a few minutes (5 to 15 minutes), depending on how many domains you have.
- Once the process is complete, a success message should appear for each domain, confirming the SSL has been installed.
6. Verify Installation:
- To ensure the SSL was installed correctly, visit your website using
https://yourdomain.comand check the browser’s padlock icon. If it’s secure, the SSL is working. - You can also use online tools like SSL Checker (e.g., https://www.sslshopper.com/ssl-checker.html) to verify the SSL status.
7. Set AutoSSL to Renew Automatically (Optional):
- AutoSSL automatically renews your SSL certificates when they are about to expire (usually every 90 days). No action is needed on your part, but you can verify that AutoSSL is set to automatically run by navigating to “Manage AutoSSL” and ensuring it’s enabled.
By following these steps, you’ll have SSL certificates installed and automatically renewed using AutoSSL. If your hosting provider supports AutoSSL, the process should be seamless.

