How to Create a Cookie-Free Domain for WordPress

Cookies: Why you need ‘em and why you don’t
Anyone who has been to a handful of sites on the internet will have some degree of familiarity with cookies. An annoying menu barging in your face telling you to PLEASE ACCEPT is hardly a pleasant experience, but it’s something that every other website will give you once you click on them.
So, what are cookies? What’s the point of ‘em?
Let’s answer these questions first before diving into the whole how-to stuff.
Cookies are basically small bits of data that a website stores on your web browser so that it can recognize you, should you come visiting again. You might have seen that some websites you re-visit have your preferences or settings adjusted the same way as you had left them. Yep, that’s what cookies do.
It’s like going to the supermarket for the monthly grocery shopping and placing an order for a whole bunch of stuff. The store clerk gives you a small token and says that if you show me this thing the next time you visit, I’ll fetch all those items and products for you without you having to rattle them off from a list.
And that’s what you do. Instead of going from aisle to aisle, picking stuff, and loading up your cart, you just call the clerk, give him the token and wait as your things get fetched for you.
So, a cookie is what the website hands over to you – to your browser. It’s how the website knows who you are and what you want.
Now, you could be thinking that this thing’s pretty neat. What’s with the whole ‘no-cookie domain’ thing?. Well, folks, it is neat. But only when it is used necessarily. When unnecessary cookies are stored on your browser, things start to get slow and sluggish.
Cookies that have absolutely no purpose will get collected on your browser like dust on a doorstep. The website will have to contend with all those before it loads. And that will slow down your loading speed.
And here is where you don’t need cookies.
Cookie-Free Domains and Static Content
With dynamic content viz. the content that has to be created and tailored particularly for your need and preference, there is no choice but to use cookies. If you visit a blog, for example, and read a couple of posts, it will show you your ‘Recently viewed’ stuff the next time you go there. So, this element i.e., where something is particularly generated and altered for you, is called dynamic content.
On the other hand, static content is that which is just going to lie on a website and not be changed regardless of who visits it. Take an ‘About Us’ page, for example. Now, that ‘About Us’ page is going to stay the same every time you open it up, and regardless of who visits it. If you go there a couple of times repeatedly, you aren’t exactly going to get a message saying “Back again, are you, you gimcrack?” because the page doesn’t know who you are and how many times you’ve been to it.
So, with a cookie-free domain, you can show static content, but not dynamic. That is the crux of the above discussion. The usual way to set up a domain that shows only the content without cookies is to create a sub-domain. As the name tells us, the sub-domain is a part of a larger and actual domain name.
For example, if there is a certain website with the domain name ‘www.webstore.com’ then a subdomain could be ‘blog.webstore.com’.
How to create a Cookie-Free domain on WordPress with cPanel
Here’s how you can create a cookie-free domain on WordPress with cPanel. Like a lot of other things that you can do on the latter, this process is quite simple.
• Creating a subdomain
As we discussed upstairs, the way to create a cookie-free domain is to make a subdomain that shows only the static content. Hence, that is our first step here.
To create the subdomain, go over to the ‘Domains’ menu. Here, you will find a few fields. Let me chuck in a picture here…

In the top field, you will have to write the name of the subdomain and below that is where you’ll the name of the top domain viz. the madré domain.
Below these two fields is the Document Root. Here is where you have to enter the ‘wp-content’ directory.
• Editing the ‘wp-config.php’ file
Once the above step is done, we know have to set up WordPress so that it knows it has to serve static content via the new subdomain.
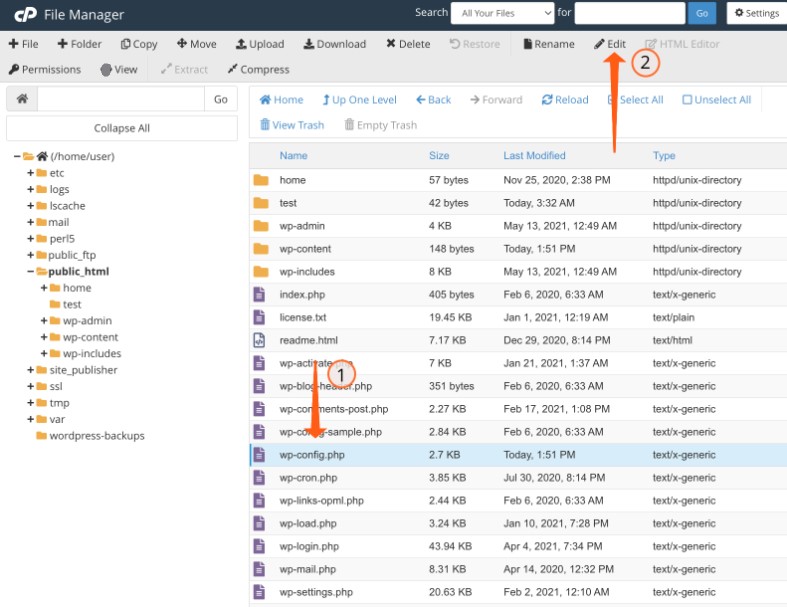
From the main menu, go to the category marked ‘Files’ and click on ‘File Manager’. You’ll see this screen appear:

The screenshot pretty much tells you what you have to do next. First, click on the ‘wp-config.php’ file and then go up to the option marked ‘Edit’.
Thereafter, enter these commands in the file:
define(“WP_CONTENT_URL”, “static.example.com”); define(“COOKIE_DOMAIN”, “www.example.com”);
Of course, you will have to make changes to the lines according to the names of your domains and subdomains.
Conclusion
The above process will create the subdomain and direct WordPress to show the static content from it. However, this will not migrate the existing static content to the new subdomain. For that, there is an additional step that you have to do via the PhpMySQL menu.
But, what we discussed above should be sufficient for creating a cookie-free domain and setting it up to work.

