How do I import or Export a database to phpMyAdmin?
If you want to restore a database backup, follow this guide to import it to phpMyAdmin.
- Step 1 – Open your database in phpMyAdmin
- Step 2 – Click Databases in the top-menu
- Step 3 – Click the name of the database you want to import to
- Step 4 – Click Import
- Step 5 – Choose file and click Go
- Step 6 – You’re done
Details
One of the most important components, when you make a website, is a database. Whether you use common CMS platforms like WordPress, Magento, Joomla, or other PHP frameworks such as Laravel, CakePHP, or CodeIgniter, you will probably need to integrate a database that stores the website data.
In this article, we will focus on exporting and importing one of the most popular database management systems, MySQL. This knowledge will come in handy if you wish to transfer your database to another server or simply to create a database backup.
There are two easy ways on how export and import MySQL databases:
Use phpMyAdmin
-Use SSH command line
Now we will explain each method in detail below, so read on!
How to Export and Import MySQL Through phpMyAdmin
Exporting
To export an existing MySQL database using phpMyAdmin, make sure you are logged in to your cPanel area first. Once you’re in, type phpMyAdmin on the top right search bar and click on the option shown:

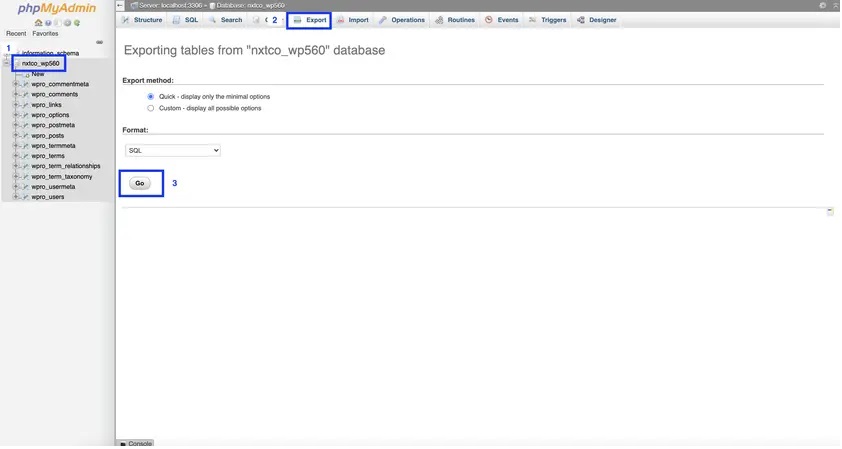
A new browser window will open and the next step is to select the database you would like to export. Make sure you select the correct one, if there are multiple databases. Once the database is selected, click “Export” and on the “Export Method” option, choose Quick. Next, you can choose “SQL” format if you wish to re-import the database again elsewhere. Lastly, click Go.

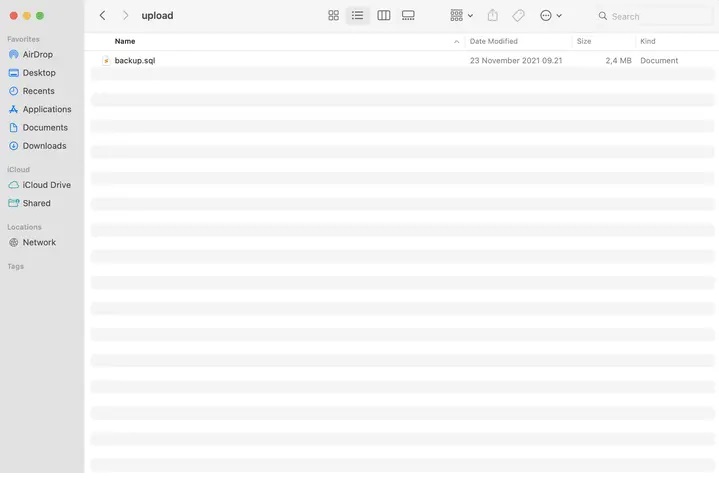
Now all you have to do is to wait for a few minutes (or seconds, if your database is quite small), until the export process is complete. You should now be able to find the .sql file within your Downloads folder.
Importing
Again, you will need to go to your cPanel and navigate to phpMyAdmin

Prepare your SQL database file that you’d like to import

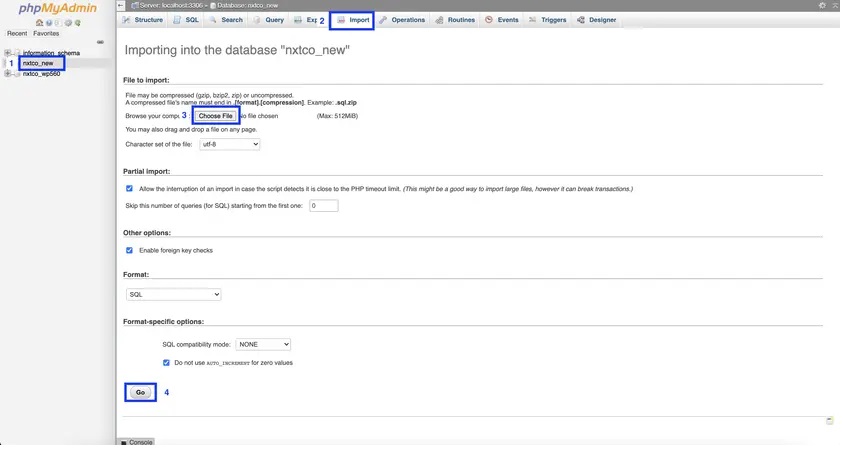
Now that you have the SQL file ready, go back to phpMyAdmin, and select the empty database (If you haven’t created it yet, go back to cPanel > MySQL Database Wizard). After selecting the database, go ahead and click the “Import” button on the top bar. Next, click “Choose File” to select the .sql file. Then scroll down and click Go.

Importing a MySQL database will take a few minutes normally. When it is done, there will be a prompt saying “Import has been successfully finished” and you will be able to see the content of your SQL database within the previously empty one.
How to Export and Import MySQL Through SSH command line
Note: To export and import MySQL via the command line, the cPanel SSH access must be enabled. Make sure you do know basic SSH commands to login to your server via Terminal or PuTTY. You will also need to have the database credentials such as the database name, user, and password.
Exporting
First, open your terminal or PuTTY and login to your hosting account. Once logged in, navigate to the directory where you wish the SQL database to be exported and type in this command below:
mysqldump -u DBUSERNAME -p DBNAME > dbbackup.sql
Make sure to replace the DBUSERNAME with the correct database username and DBNAME with the correct database name.
Here’s the breakdown of the command:
mysqldump is the initial command to export the MySql database.
-u clarifies the username of MySQL database
-p specifies the need to use the database password
dbbackup.sql : the result of the export
After typing the command above, you will then be asked to enter the database password. If the password is correct, the export progress will start. Once finished, type in the command ls and the dbbackup.sql should be visible.
Here’s a screenshot taken from Terminal for reference:

Importing
Luckily, importing a MySQL database via SSH includes almost the same exact steps as exporting one. Once you are logged in to your server via Terminal or PuTTY, navigate to the directory where you store the SQL file that you wish to import to an existing empty database. Then run this command:
mysql -u DBUSERNAME -p DBNAME < dbbackup.sql
Don’t forget to replace the DBUSERNAME and DBNAME to the correct database username and name accordingly.
Command Breakdown:
mysql is the initial command to import the MySql database.
-u clarifies the username of MySQL database
-p specifies the need to use the database password
dbbackup.sql : the SQL file that will be imported
You will then be prompted to input the correct password and afterward the import progress will be initiated. Depending on the database size, it can take a few seconds or minutes for the database import to finish.
Here’s another screenshot that can help you:

Conclusion
Now that you see how impeccably easy it is to import or export a MySQL database, there’s no need to worry if there comes a day when you need to do either. For beginners, it’s always recommended to export or import the databases via phpMyAdmin as it’s much easier and GUI-based. For the more experienced users out there, feel free to type in those commands above from your terminal and voila! Your SQL database will be exported/imported in no time!

